

Post by kiwiearl on Dec 31, 2011 19:14:08 GMT -5
As Sarracenia lovers we eventually all get to the point where we have an ever increasing number of specimens. When it comes to managing a collection there are a number of options. The following may be food for thought if you want to display some of your outdoor collection.
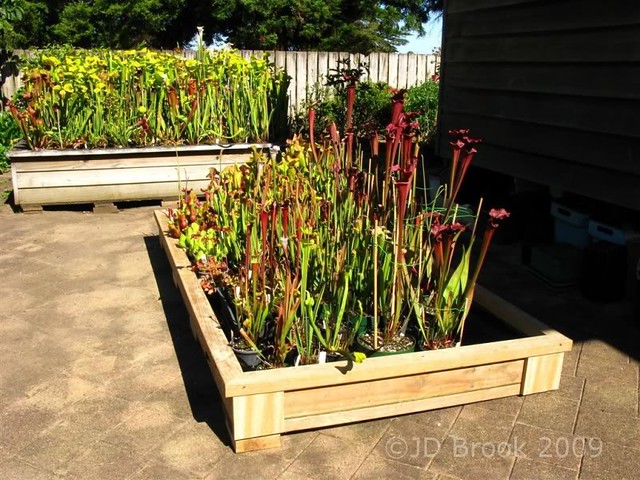
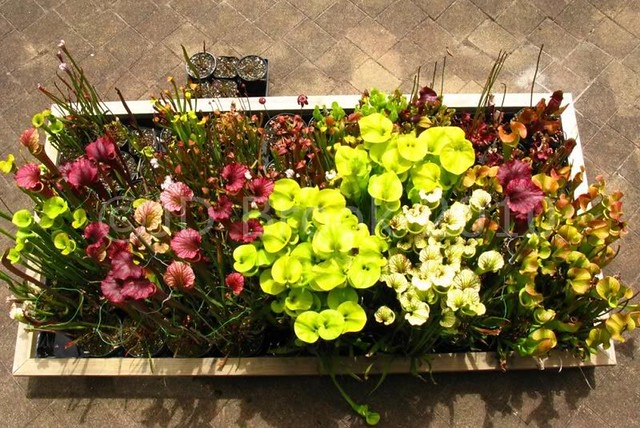
As a long term outdoor grower myself, I favour the use of stand-alone display boxes that show off some of my plants at their best while allowing for easy care. My preference is for timber with the plants in individual pots standing in communal water. Pretty simple to construct, here's a generic example of how I make mine.
Some points to note:
1) All measurements are in millimetres
2) All timber is treated."H3" is a local above ground moisture resistant designation
3) All nails are galvanised
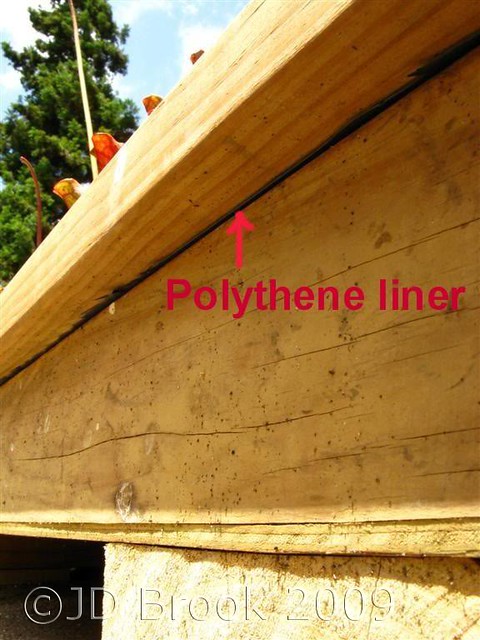
4) Heavy grade polythene is used. Black inhibits algal growth.
To make the sides of the box construct a frame that meets the dimensions of the plywood sheet. Then fix the ply to the frame. Once completed, on the underside of the ply fix timber members that span its width at regular intervals along its length & at both ends. These are essential to prevent the inevitable sagging that would result from the weight of both plants & water. The ply needs to remain flat so that the water table is even. The secondary benefit of these members is in that they allow airflow beneath the box which prevents the water from becoming possibly and/or detrimentally hot. External timber end plates cover the framing joint and provide rigidity.
Now turn the box over & install the polythene. I use twice the area needed & fold into two thereby giving a double thickness for added security against any holes that would allow water to get between the polythene & the ply base albeit that these are unlikely when using a heavy grade. Folding the internal corners neatly, make sure the polythene is a reasonably loose fit before fixing to the top of the sides. It is important that the fit is loose as when the water is added you will be surprised how much it will influence the final fit of the polythene. A small depth of water added before you fix to the frame will form the polythene into corners. Use small flat head nails at close intervals to then fix the polythene to the top of the sides.
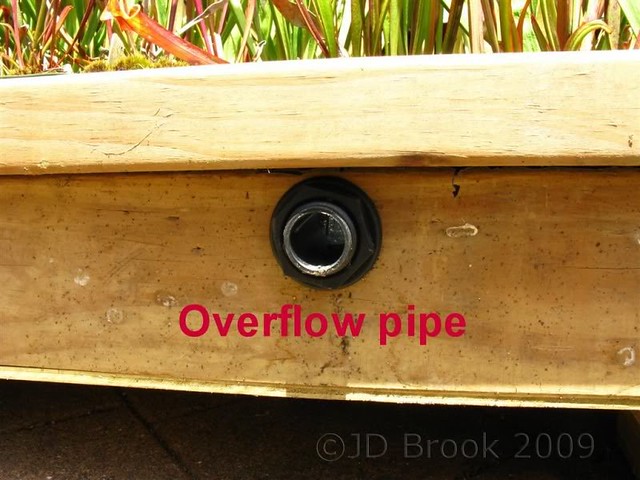
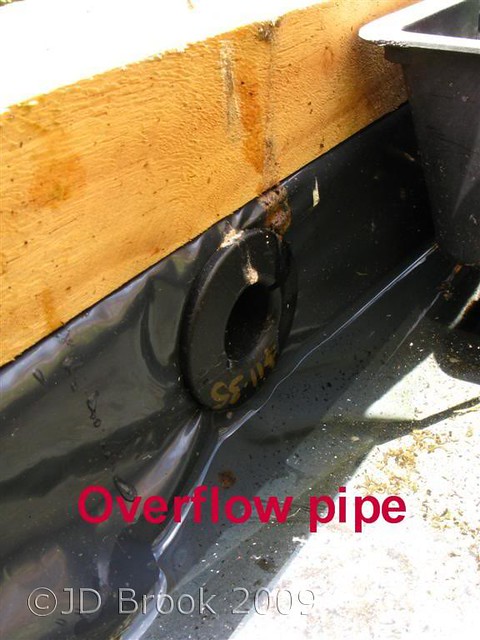
As can be seen in the previous photo an overflow drain has been fitted. The type I favour for my boxes are threaded marine grade thru-hull fittings with a large flange. An overflow is a vital component in a display box to ensure a pre calculated water level is maintained while preventing outright flooding. Carefully consider the water level you want to use before installation of the overflow. Drill the hole in the timber before you fit the polythene bearing in mind that the lower circumference of the fitting determines the eventual water level. Once fitted, cut a corresponding hole in the polythene that is smaller than the external diameter of the pipe. When the pipe is pushed through this hole the polythene will be forced into the hole in the timber thereby ensuring that any water that ever got behind the flange of the pipe would be carried outboard rather than end up between ply bottom & polythene. With the overflow fitting pushed home through the hole, tighten the nut firmly with a wrench. This is where the flange on the fitting comes into play. It not only spreads the tension on the polythene widely but, against the flat surface of the timber side, it delivers a good seal without the need for sealant. Having said that, it is only the very bottom of the flange that is ever under water.
The beauty of outdoor growing, where I live at least, is that the rain will take care of almost all your watering needs in this sort of box. The amount of supplemental hose watering I have to do is absolutely minimal (luckily for me, water out of our taps here is free from minerals etc). That's another benefit of a well considered overflow installation - if you leave the hose on when filling you're not going to flood the box.
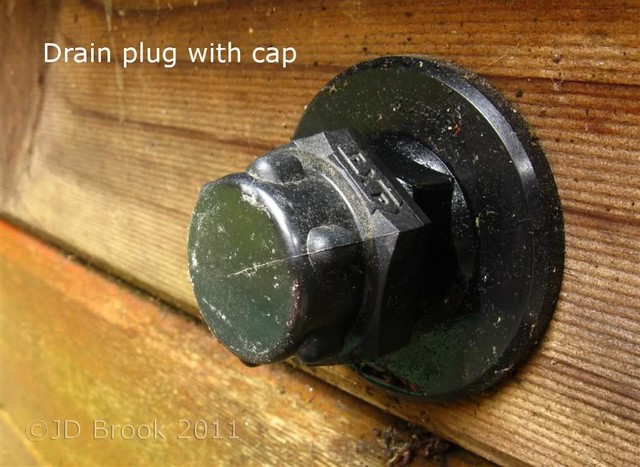
At this point, it's important to mention that a similar outflow fitting should be installed at a much lover level than the overflow to act as an out & out drain for the box. This allows for the control & minimisation of water during the winter dormancy period. In my location there is much winter rainfall so a drain is essential in order that the growing medium doesn't remain saturated. As can be seen in this photo, leave enough of the threaded pipe remaining before cutting to a finished length once the fastening nut is installed to enable a screw on end cap to be used during the growing season when you want your overflow to regulate the water level.
The next job is to fit the top finishing rails. The next two photos below illustrate this final but important feature of a display box.
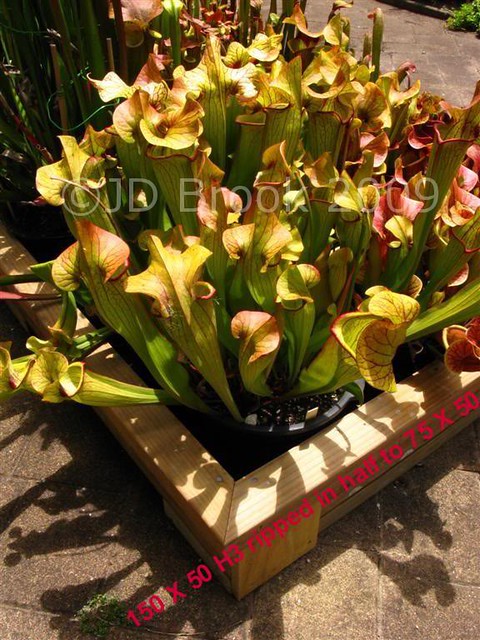
Being outside exposed to both sun & rain for many years to come, a few things are fairly critical with respect to a good long term result, both in look & functionality. All lengths of timber will warp & twist given long term exposure to the sun. Therefore, the timber profile used for the rails must be thick enough & wide enough to resist this as much as possible. In the case of the box I've used to illustrate the construction process here, I've used the same timber as used for the sides & the supports to the bottom of the box, only I have ripped (cut lengthways) the width in half. I find this aesthetically marries with the other timber components while meeting the anti-warp requirement. In looking closely at the following photo you can see that the 100mm flat-head nails fixing the rails to the sides are at close intervals. This is essential in terms of the overall rigidity of the box & to ensure the prevention of warping over the length of the rails.
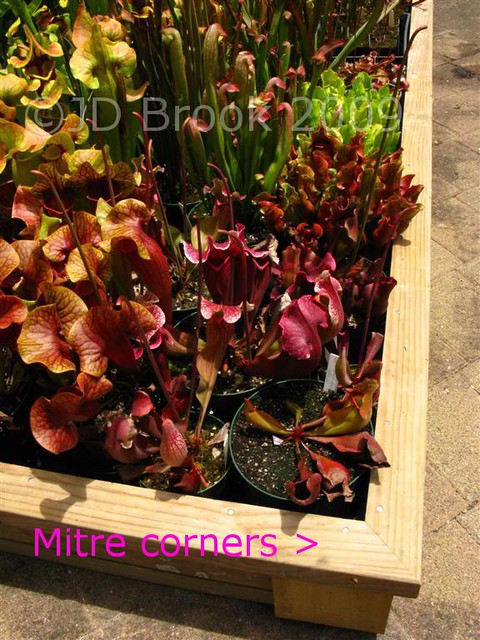
Mitred corners make for a pleasing, properly finished appearance while adding to the strength of construction. Again, this is another area where the sun & moisture inherent in the outdoors will do their worst. Quality mitre cuts are important not only for looks but to ensure a strong joint can be maintained under harsh weathering. The addition of a long countersunk galvanised screw installed edgewise across the joint will do wonders in maintaining the integrity of its finish (you can just make out a screw in each joint in some of the photos).
For a clean look, trim the excess polythene beneath the rails.
For my part, the most important aspect in the construction of a display box is a pre-construction design calculation that means the plants will be displayed cleanly & to their best advantage - after all, that's the whole point.
To achieve this, I use the height of the pots I grow my mature Sarracenia in as my measurement for the height of the top of the finishing rail from the bottom of the box. Once filled with plants this delivers a very clean look to the overall display. As little as possible of the pots can be seen, the eyes are drawn to the plants themselves as the overriding feature & the rhizomes are at what you might call, ground level. I hope you can appreciate what I mean in looking at the photos below of these two displays.
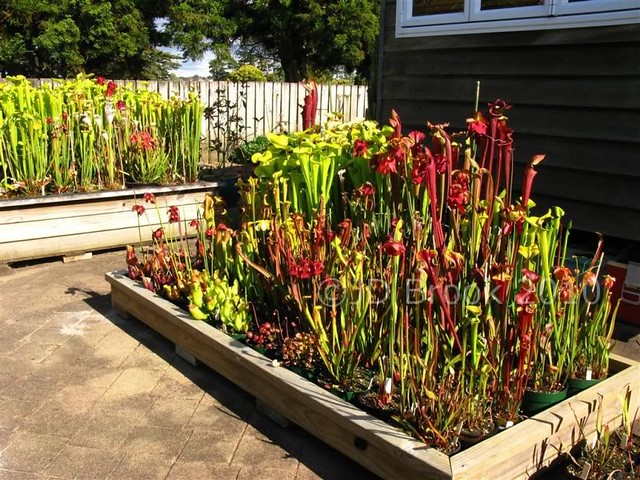
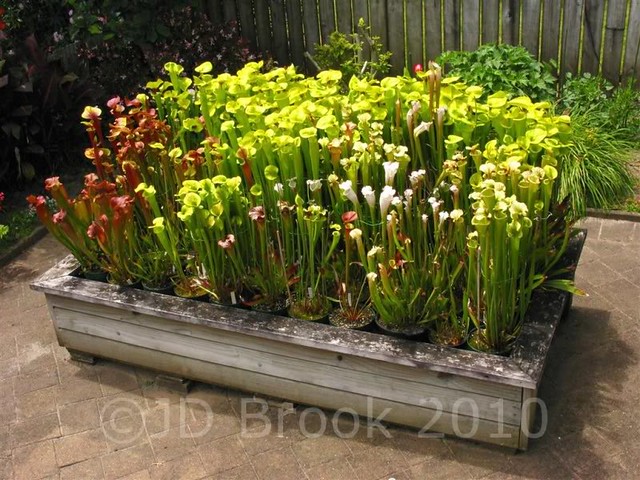
Clearly this particular box has more height to it than the one featured. It has a internal floor staged at at a level that provides for the same pot/finishing rail relationship. In comparison to the lower box this one allows the viewer to meet with the Sarracenia on something approaching the eye to eye, if you will. It also makes for a pleasing contrast within the overall space these two boxes occupy.
Finally, two other considerations must be mentioned when employing such boxes for displaying Sarracenia. The first may not be so obvious, but the second surely is:
1) What ever the nature of the landscape, make certain that any box is set up at a totally level attitude so the water remains level across its area. Once the water has stood for a while, think about introducing a variety of water snail that will deal to the inevitable algae growth. These self-perpetuating characters will do a fantastic job for you & will save you a lot of cleaning work (less if the box is full).
2) Site the box/boxes in a location whereby the plants get the maximum amount of sun each day. For outdoor plants, the longer the better!!
As I say, there are numerous valid, successful approaches to growing Sarracenia outdoors. I hope this particular variation on the theme may be of some use to those readers who are considering all the options in contemplation of setting up a collection outside. It can be a big leap to do so, but I think my colleagues in outdoor growing (at least one I'm certain!) will back me up in agreeing - the rewards are many and satisfying.
As a long term outdoor grower myself, I favour the use of stand-alone display boxes that show off some of my plants at their best while allowing for easy care. My preference is for timber with the plants in individual pots standing in communal water. Pretty simple to construct, here's a generic example of how I make mine.
Some points to note:
1) All measurements are in millimetres
2) All timber is treated."H3" is a local above ground moisture resistant designation
3) All nails are galvanised
4) Heavy grade polythene is used. Black inhibits algal growth.
To make the sides of the box construct a frame that meets the dimensions of the plywood sheet. Then fix the ply to the frame. Once completed, on the underside of the ply fix timber members that span its width at regular intervals along its length & at both ends. These are essential to prevent the inevitable sagging that would result from the weight of both plants & water. The ply needs to remain flat so that the water table is even. The secondary benefit of these members is in that they allow airflow beneath the box which prevents the water from becoming possibly and/or detrimentally hot. External timber end plates cover the framing joint and provide rigidity.
Now turn the box over & install the polythene. I use twice the area needed & fold into two thereby giving a double thickness for added security against any holes that would allow water to get between the polythene & the ply base albeit that these are unlikely when using a heavy grade. Folding the internal corners neatly, make sure the polythene is a reasonably loose fit before fixing to the top of the sides. It is important that the fit is loose as when the water is added you will be surprised how much it will influence the final fit of the polythene. A small depth of water added before you fix to the frame will form the polythene into corners. Use small flat head nails at close intervals to then fix the polythene to the top of the sides.
As can be seen in the previous photo an overflow drain has been fitted. The type I favour for my boxes are threaded marine grade thru-hull fittings with a large flange. An overflow is a vital component in a display box to ensure a pre calculated water level is maintained while preventing outright flooding. Carefully consider the water level you want to use before installation of the overflow. Drill the hole in the timber before you fit the polythene bearing in mind that the lower circumference of the fitting determines the eventual water level. Once fitted, cut a corresponding hole in the polythene that is smaller than the external diameter of the pipe. When the pipe is pushed through this hole the polythene will be forced into the hole in the timber thereby ensuring that any water that ever got behind the flange of the pipe would be carried outboard rather than end up between ply bottom & polythene. With the overflow fitting pushed home through the hole, tighten the nut firmly with a wrench. This is where the flange on the fitting comes into play. It not only spreads the tension on the polythene widely but, against the flat surface of the timber side, it delivers a good seal without the need for sealant. Having said that, it is only the very bottom of the flange that is ever under water.
The beauty of outdoor growing, where I live at least, is that the rain will take care of almost all your watering needs in this sort of box. The amount of supplemental hose watering I have to do is absolutely minimal (luckily for me, water out of our taps here is free from minerals etc). That's another benefit of a well considered overflow installation - if you leave the hose on when filling you're not going to flood the box.
At this point, it's important to mention that a similar outflow fitting should be installed at a much lover level than the overflow to act as an out & out drain for the box. This allows for the control & minimisation of water during the winter dormancy period. In my location there is much winter rainfall so a drain is essential in order that the growing medium doesn't remain saturated. As can be seen in this photo, leave enough of the threaded pipe remaining before cutting to a finished length once the fastening nut is installed to enable a screw on end cap to be used during the growing season when you want your overflow to regulate the water level.
The next job is to fit the top finishing rails. The next two photos below illustrate this final but important feature of a display box.
Being outside exposed to both sun & rain for many years to come, a few things are fairly critical with respect to a good long term result, both in look & functionality. All lengths of timber will warp & twist given long term exposure to the sun. Therefore, the timber profile used for the rails must be thick enough & wide enough to resist this as much as possible. In the case of the box I've used to illustrate the construction process here, I've used the same timber as used for the sides & the supports to the bottom of the box, only I have ripped (cut lengthways) the width in half. I find this aesthetically marries with the other timber components while meeting the anti-warp requirement. In looking closely at the following photo you can see that the 100mm flat-head nails fixing the rails to the sides are at close intervals. This is essential in terms of the overall rigidity of the box & to ensure the prevention of warping over the length of the rails.
Mitred corners make for a pleasing, properly finished appearance while adding to the strength of construction. Again, this is another area where the sun & moisture inherent in the outdoors will do their worst. Quality mitre cuts are important not only for looks but to ensure a strong joint can be maintained under harsh weathering. The addition of a long countersunk galvanised screw installed edgewise across the joint will do wonders in maintaining the integrity of its finish (you can just make out a screw in each joint in some of the photos).
For a clean look, trim the excess polythene beneath the rails.
For my part, the most important aspect in the construction of a display box is a pre-construction design calculation that means the plants will be displayed cleanly & to their best advantage - after all, that's the whole point.
To achieve this, I use the height of the pots I grow my mature Sarracenia in as my measurement for the height of the top of the finishing rail from the bottom of the box. Once filled with plants this delivers a very clean look to the overall display. As little as possible of the pots can be seen, the eyes are drawn to the plants themselves as the overriding feature & the rhizomes are at what you might call, ground level. I hope you can appreciate what I mean in looking at the photos below of these two displays.
Clearly this particular box has more height to it than the one featured. It has a internal floor staged at at a level that provides for the same pot/finishing rail relationship. In comparison to the lower box this one allows the viewer to meet with the Sarracenia on something approaching the eye to eye, if you will. It also makes for a pleasing contrast within the overall space these two boxes occupy.
Finally, two other considerations must be mentioned when employing such boxes for displaying Sarracenia. The first may not be so obvious, but the second surely is:
1) What ever the nature of the landscape, make certain that any box is set up at a totally level attitude so the water remains level across its area. Once the water has stood for a while, think about introducing a variety of water snail that will deal to the inevitable algae growth. These self-perpetuating characters will do a fantastic job for you & will save you a lot of cleaning work (less if the box is full).
2) Site the box/boxes in a location whereby the plants get the maximum amount of sun each day. For outdoor plants, the longer the better!!
As I say, there are numerous valid, successful approaches to growing Sarracenia outdoors. I hope this particular variation on the theme may be of some use to those readers who are considering all the options in contemplation of setting up a collection outside. It can be a big leap to do so, but I think my colleagues in outdoor growing (at least one I'm certain!) will back me up in agreeing - the rewards are many and satisfying.


 Here are images of plant progress on 03/16/2023